Labels

Friday, February 22, 2013

Lean-To Plans Update

Quick update on the lean-to plans.  I am going to use concrete deck footings rather than embed it in the ground.  Then it will be mobile if we decide to re-arrange the yard.  Also I've priced it all out at Lowes.
 
Price list:  (minus 10% + taxes)
Concrete Deck Block 6 6.43 38.58
4x4x8' treated 3 7.57 22.71
4x4x6' treated 3 6.27 18.81
2x4x8 13 2.99 38.87
2x4x10 8 4.55 36.4
2x6x8 2 5.39 10.78
2x6x10 2 6.57 13.14
15/32 plytanium 3 19.47 58.41
80 sqft shingles 3 28.03 84.09
4x8 siding 7 25.24 176.68
Total 498.47
10% Veteran Discount 448.623
add 7% Sales Tax 480.0266
 

Thursday, February 14, 2013

New USA Made Jeans

In trying to buy American products, clothing is one area that is always difficult, or WAY too expensive.  After searching the internet for a while I found a company called All American Clothing that sold jeans that are made in the USA, from American cotton, that is milled, cut, and sewn in the USA.  Each pair of jeans that came with a certificate of authenticity and a traceability number.  When typed into their web page it allows you to track your jeans all the way back to the field that the cotton was grown in.  While I could get cheaper jeans at Wally World, these were under $50.  They are quite comfortable also. 


Wednesday, February 13, 2013

First 8 Frames

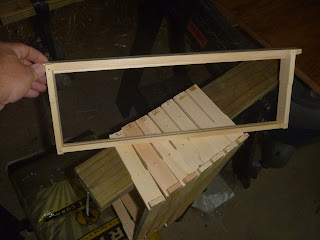
32 pieces of wood, some Tightbond III glue, 64 3/4 inch brads, and 64 1 inch brads later we have the first 8 frames ready for foundation.  I have the foundation in the closet but the wire is in transit from Brushy Mountain...... so...... maybe this weekend.  With the nucs coming with 5 frames I'm going to need 3 frames for each brood chamber.  It's slow going, but if I get a few done each night I will have all 48 done in a few weeks.  Once the wire gets here I'll put up a picture of the finished frames.


Tuesday, February 12, 2013

Lean-To-Plan

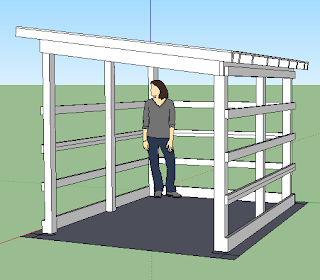
Image of the planned lean-to that is going behind the chicken coop to store straw and the lawn equipment.  The siding is left off to view the structure in the drawing.

Monday, February 11, 2013

Desk Update 02/11/13

The desk is in 25 pieces still being varnished.  One more coat on this side and three on the other and it will be ready for assembly.


Desk Plans

We have this space at the base of the stairs that Danielle wants to turn into a "office".  More specifically, a space to organize the kids home school materials.  As with most projects I've started with a SketchUp drawing.


Once I have built it is SketchUp I will transfer the plans to Visio to plan out the cut diagrams.


After all the individual pieces were cut, I banded the visible edges with the same oak veneer that I used on the shelves in the play room.  Then it was all stained.  Currently I am in the varnish, sand varnish loop.  I'm hoping to finish all the varnishing this week and begin assembly this weekend.  I know Danielle is anxious to put away the piles of school supplies she has acquired.  The entire desk will be put together with biscuits.  I'll try and takes some pictures of the progress tonight and upload them tomorrow.


Hives are Painted

The weather cooperated this weekend and I finally was able to finish painting the bee hives.  A few weeks ago we were at Lowes and they had a couple of gallons of Deck paint on their clearance rack for $5 a gallon.  With an original price of $28 I couldn't pass that up.  One gallon was grey and one was a green/blue color.   Two coats later an the hives are off gassing for the next two months before the bees arrive. 


Saturday, February 9, 2013

Hive Choice

After deciding to get bees in the spring there were some decisions to be made.  Among there were:
  • Top bar or Langsroth hives?
    • While both types of hives are productive there were a few reasons that I chose to go with the Langstroth hive over the top bar.  The main difference between the two is that inside a Langstroth hive the box is filled with frames that the bees build their comb in.  The top bar is so named because there is just a top bar that the bees suspend their comb from.  Some argue that the top bar is more natural for the bees, giving them the choice on how to build their comb.  You end up with a comb that is shaped something like a U. 
Top Bar Comb
 
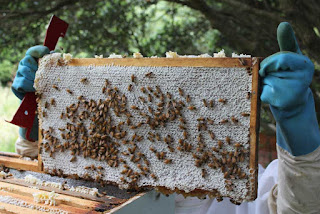
    • The comb that comes out of a Langstroth hive is built in a frame that can be removed from the hive and replaced once the honey is extracted.  Eventually I would like to get a honey extractor that spins the comb, pulling the honey out.  This will allow you to put the comb back in the hive, saving the time that the bees would spend rebuilding it.
Langstroth Frame
 
  • What size Langstroth Hives?
    • A "traditional" Langstroth hive is made up of boxes that contain 10 frames.  The boxes, called supers, come in 3 depths.  Shallow 5 3/4", medium 6 5/8", and deep 9 5/8".  Traditionally the bottom two boxes would be deeps for the brood chamber, then mediums or shallows on top for honey.  Having three different size supers would mean that one would have to manage and maintain three different sizes of frames as well, to include three different sizes of foundation.  To simplify things many beekeepers are standardizing on only using medium supers.  I'm all about simplicity, definitely going with all mediums.
    • Additionally I've chosen to go with 8 frame hives instead of 10.  This is simply because they are lighter.  A full 10 frame super weighs around 50 pounds compared to a 40 pound eight frame super.  If the bees need more space they can expand up into the next super. 
 
  • Where to purchase the bees/equipment/hives
    • The gentleman that introduced me to bees also introduced me to the concept of small cell chemical free bees.  This could be a post on its own so I'll just say that we're getting our bees from the FatBeeMan (Don Kuchenmeister) at http://dixiebeesupply.com
    • I ordered all my beekeeping equipment (smoker, veil, tools, small cell foundation, etc) from http://www.brushymountainbeefarm.com/.  I REALLY liked their hives also, but after adding shipping the price was cost prohibitive.  They are a family owned business that manufactures in house. 
    • I ended up buying my hives from Rossman Apiaries http://www.gabees.com because it was within driving distance.  Their hives aren't box jointed and they didn't have a 8-frame medium kit so I had to piece it all together.  I drove down to their shop and have to say that I wasn't too impressed with them.  I suppose they are used to the professional beekeeper coming in with large orders.  I got the feeling that my two hives was almost an annoyance.  You could tell they do most of their business through the mail.  The young man that boxed it all up was awesome though.  He had it down to a science.


Friday, February 8, 2013

The Bee Backstory


     We have been buying local honey for a couple of years now.  One thing we learned pretty quickly when we moved to Georgia was that the pollen in the air here will make someone that has never had an allergy to anything miserable.  They say that eating local honey will help the body cope with the varying pollens in the area.  Combine that with my desire to purchase what I can locally, we began consuming local honey. 

     On our property we already had a nice garden, some chickens, ducks, and turkeys.  I had been interested in bees since I started gardening, simply for their pollination.  One day at church I started talking to a gentleman who had a few hives.  He invited me to the Southwest Georgia (SOWEGA) beekeepers meeting to get more information.  They meet at Cheehaw park near Albany on the second Thursday of each month at 6:30.  The SOWEGA beekeepers are some of the nicest people one could hope to meet, full of information and always willing to share their experiences.  After a few months of attending he invited me to come over while he opened up his hives. 

     He has two hives different styles of hives.  One it a top-bar hive, the second is a Langstroth.  I'll admit, the first time walking up to a bee hive to intentionally open it up made me a bit nervous.  However, after a bit of smoke I was amazed at how docile they actually were.  As with most people, my past experiences with bee hives had been unintentional and ended in pain.  We opened both hives and he robbed some honey.  I did get stung once on my ring finger, but it wasn't as bad as I remember as a child.  After the day in the hives I was ready to jump in and order some bees.  Unfortunately it was late fall and they are only available in the spring. So...... we wait.

These are the two types of hives. 

Top Bar Hive
 
 
Langstroth Hive
 

Sunday, February 3, 2013

Wheel Plow Restored

      One day while talking to the neighbor that lives behind us about the upcoming spring garden he told me that he had an old wheel plow in his shed that I could have if I wanted it.  I was busy that day so I couldn't check it out.  About a week later I ran into him in the yard and went back to his shed to check this thing out.  What he had was an old wheel plow that he had bought in the 60s.  It was pretty weathered.  The handles were shot and it was covered in rust.  But.... the price was right, free.  I took it back up to the house and started pondering how to clean it up. 
      I knew that I would have to make new handles for it.  That was simple enough.  I bought a piece of red oak from Lowes and traced the old handles to it.  After a quick cut with the jig saw we had rough handles.  I used a roundover bit on the router t smooth the sides and sanded them down.  A coat of "early American" Minwax and two coats of varnish later and they were ready.
     Cleaning up the cast iron and steel was a bit more complicated.  At first I was thinking of using the dremel to clean it, but that seemed too tedious.  I remembered a YouTube video I had seen of a man cleaning a cast iron pan using electrolysis.  Here's the video if interested.  http://www.youtube.com/watch?v=0XlsNucmbiE.  The basic steps follow:
  1. Fill a bucket with water, adding one tablespoon of Arm and Hammer WASHING (not baking) soda per gallon.
  2. Find some sacrificial steel.  I used rebar pieces.
  3. Place them around the edges of the bucket and connect together with wire.
  4. Hang the part to be cleaned in the middle, making sure they don't touch.
  5. Hook a battery charger up to it, positive to the sacrificial steel negative to the part being cleaned.
  6. Go inside and come back tomorrow.  I say go inside because this should not be done inside.  What you are doing is turning the part being cleaned into the cathode which gives off Hydrogen and your sacrificial steel becomes the anode giving off oxygen during the electrolysis process.  Also, no smoking during the process, think Hindenburg
  7. Brush off the residue with a wire brush and repaint.
Hindenburg
 
 
     Unfortunately I didn't take any pictures of the process, but here is the final result.
 
 
While I was in the process of cleaning it up I found a few markings on it.  Most of the parts just had numbers but the moldboard (not pictured) had Planet Jr. stamped in the steel.  After doing some research online I found out that it is a Planet Jr. No. 19 Garden Plow and Cultivator.  If anyone is looking for info on old Planet Jr. Equipment I found a 1922 catalog online on archive.org.  Here's the link http://archive.org/details/cu31924084885676
 
This is the description from the 1922 catalog:
     No. 19. This attractive implement is especially designed for the farmer's garden work, though it offers to every one with either field or garden a cheap and effective tool for wheel-hoe operations. The standard is slotted for depth regulation and an adjustable piece carries any of the attachments that go with the machine- The cultivating tooth does deep work and marks out rows for onion sets, plants, etc. The sweep is fine for level shallow work. The five-prong cultivator attachment is bolted directly to the frame, first removing the S-37 standard. The plow marks out furrows, covers them, and plows to or from the crop as wanted; opens furrows for fertilizer, peas, beans, etc. Use the five-prong attachment for both deep and shallow cultivation. It will break up the ground and leave a mulch so necessary to reserve the moisture in the soil. The variety, shape and quality of the tools make the implement light running and effective. It is strong, well made, and quickly adjusted. The height of the handles can be changed to suit man or woman, boy or girl.